What is an SPF Record?
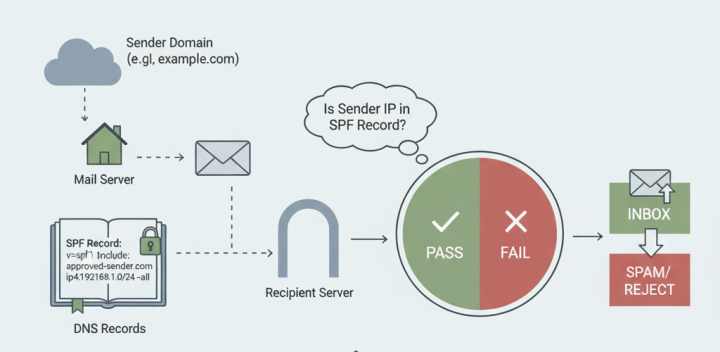
An SPF (Sender Policy Framework) record is a type of DNS (Domain Name System) record that identifies which mail servers are permitted to send email on behalf of your domain. It's a critical email authentication method that helps protect your domain against spoofing and prevents your emails from being marked as spam.
Analogy: Think of an SPF record as a guest list for an exclusive event. Only the people (mail servers) on the list are allowed to enter (send emails from your domain).
When an email is received, the receiving mail server checks the SPF record of the sending domain to verify that the email came from an authorized server. If the sending server isn't listed in the SPF record, the email may be rejected or marked as spam.
Why is an SPF Record Needed?
Prevent Email Spoofing
Without SPF, attackers can easily forge the "From" address in emails to make them appear to come from your domain, leading to phishing attacks and damage to your reputation.
Improve Email Deliverability
Email providers like Gmail, Outlook, and Yahoo use SPF to verify sender authenticity. Proper SPF configuration increases the likelihood that your emails reach the inbox.
Build Sender Reputation
Consistently passing SPF checks helps build a positive sender reputation, which is crucial for successful email marketing campaigns and business communications.
Meet Industry Standards
SPF is part of the DMARC standard, which many organizations now require for accepting emails.
How SPF Improves Email Deliverability
Email service providers use complex algorithms to determine whether an email should be delivered to the inbox, spam folder, or rejected entirely. SPF plays a crucial role in this decision-making process.
When your domain has a properly configured SPF record, receiving mail servers can verify that your emails are legitimate. This verification builds trust and improves your sender score, which directly impacts deliverability rates.
Email sent from your domain
Receiving server checks your SPF record
Email authenticated → Higher deliverability
Note: SPF is just one component of email authentication. For maximum deliverability, it should be used in conjunction with DKIM and DMARC.
Understanding SPF Record Syntax
An SPF record is a TXT record in your DNS with a specific syntax. Here's a breakdown of the components:
| Component | Description | Example |
|---|---|---|
| v=spf1 | SPF version identifier | Mandatory prefix for all SPF records |
| include | Authorizes another domain's SPF record | include:_spf.google.com |
| ip4 | Authorizes an IPv4 address or range | ip4:192.168.0.1 |
| ip6 | Authorizes an IPv6 address or range | ip6:2001:db8::/32 |
| a | Authorizes the domain's A record IPs | a |
| mx | Authorizes the domain's MX record IPs | mx |
| ~all | Soft fail for unauthorized servers | Emails from other servers are marked as suspicious |
| -all | Hard fail for unauthorized servers | Emails from other servers are rejected |
How to Set Up SPF Records in Major DNS Providers
Cloudflare
- Log in to your Cloudflare account and select your domain.
- Navigate to the "DNS" section in the dashboard.
- Click "Add record" and select "TXT" as the record type.
- For the name, enter your domain (usually "@" for the root domain).
- In the content field, enter your SPF record (e.g.,
v=spf1 include:_spf.google.com ~all). - Set the TTL (Time to Live) to "Auto" or your preferred value.
- Click "Save" to create the record.
Note: Cloudflare may take a few minutes to propagate the DNS changes globally.
Namecheap
- Log in to your Namecheap account and go to the "Domain List".
- Click "Manage" next to the domain you want to configure.
- Select "Advanced DNS" from the navigation menu.
- Find the "HOST RECORDS" section and click "Add New Record".
- Select "TXT Record" from the type dropdown.
- For the host, enter "@" for the root domain or your subdomain.
- In the value field, enter your SPF record.
- Set the TTL to the recommended value (usually 1800 seconds).
- Click the save icon (checkmark) to create the record.
GoDaddy
- Sign in to your GoDaddy Domain Portfolio.
- Click on your domain to access the Domain Settings page.
- Under "Additional Settings", select "Manage DNS".
- In the "Records" section, click "Add" to create a new record.
- Select "TXT" as the record type.
- For the host, enter "@" for the root domain.
- In the "TXT Value" field, enter your SPF record.
- Set the TTL to the desired value (1 hour is typical).
- Click "Save" to add the record.
AWS Route 53
- Log in to the AWS Management Console and open the Route 53 console.
- In the navigation pane, choose "Hosted zones".
- Select the hosted zone for your domain.
- Choose "Create record".
- Leave the record name blank for the root domain or enter a subdomain.
- Select "TXT - Text" as the record type.
- In the value field, enter your SPF record enclosed in quotes.
- Set the TTL value as needed.
- Click "Create records" to save.
Google Domains
- Sign in to Google Domains with your account.
- Select the domain you want to manage.
- Click on "DNS" in the left navigation menu.
- Scroll down to the "Custom resource records" section.
- In the first field (@ for root domain or subdomain name), leave blank for root or enter subdomain.
- Set the type to "TXT".
- In the "TTL" field, enter the time in seconds (3600 is typical).
- In the "Data" field, enter your SPF record.
- Click "Add" to save the record.
SPF Record Best Practices
Do's
- Use the
~allmechanism initially for soft fails - Regularly review and update your SPF record
- Use the
includemechanism for third-party email services - Keep your SPF record under 10 DNS lookups (limit is 10)
- Test your SPF record using online validation tools
Don'ts
- Don't create multiple SPF records for the same domain
- Avoid using
+all(pass all) as it defeats the purpose - Don't forget to include all email sending services you use
- Avoid exceeding the 10 DNS lookup limit
- Don't set TTL values too high when testing or making changes
Important: DNS changes can take up to 48 hours to propagate globally, though it's usually much faster. Always verify your SPF record after making changes.
Testing Your SPF Record
After setting up your SPF record, it's crucial to verify that it's working correctly. Here are some methods to test your SPF configuration:
Command Line
Use dig or nslookup commands to check your TXT records
Online Tools
Use websites like MXToolbox, SPF Record Testing Tools
Send Test Emails
Send emails to accounts on different providers and check headers
Conclusion
Implementing a proper SPF record is a fundamental step in securing your domain's email communications and improving deliverability. While the initial setup might seem technical, most DNS providers have simplified the process with user-friendly interfaces.
Remember that SPF is just one part of a comprehensive email authentication strategy. For maximum protection and deliverability, consider implementing DKIM and DMARC as well.
Final Tip: Regularly audit your SPF record, especially when adding new email marketing services or changing your email infrastructure. This ensures your record remains accurate and effective.