What is a DMARC Record?
DMARC (Domain-based Message Authentication, Reporting, and Conformance) is an email authentication protocol that builds upon SPF and DKIM. It allows domain owners to specify how receiving mail servers should handle emails that fail SPF and/or DKIM checks, and provides a reporting mechanism for monitoring authentication results.
Analogy: If SPF is your guest list and DKIM is your signature, DMARC is the bouncer who checks both and decides what to do with uninvited guests.
DMARC helps protect your domain from being used in email spoofing, phishing attacks, and other email-based fraud by providing clear instructions to receiving servers about how to handle emails that claim to be from your domain but fail authentication checks.
Why is DMARC Important?
Prevent Domain Spoofing
DMARC provides a policy that tells receiving servers what to do with emails that fail SPF/DKIM checks, making it much harder for attackers to spoof your domain.
Visibility and Reporting
DMARC provides detailed reports about who is sending email using your domain, helping you identify legitimate senders and detect abuse.
Improve Deliverability
Domains with properly configured DMARC records are trusted more by email providers, leading to better inbox placement rates.
Industry Compliance
Many industries now require DMARC implementation as a security best practice, and some email providers give preferential treatment to DMARC-protected domains.
How DMARC Works
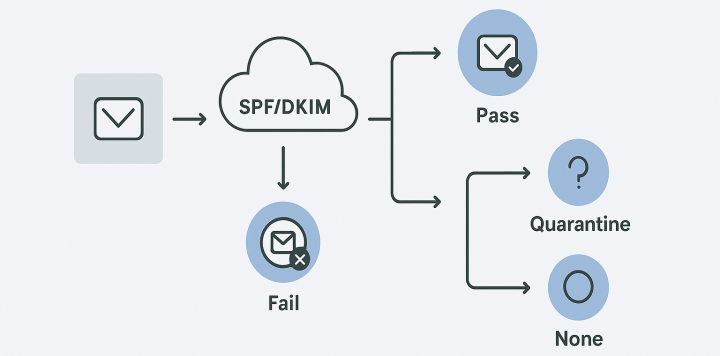
DMARC works by allowing domain owners to publish a policy in their DNS records that specifies how email receivers should handle messages that claim to be from their domain but fail authentication checks.
When an email is received, the receiving server checks for a DMARC record. If found, it evaluates the email against both SPF and DKIM, then applies the DMARC policy based on the authentication results.
Email received claiming to be from your domain
Receiver checks SPF, DKIM, and DMARC records
Policy applied based on authentication results
Note: DMARC requires both SPF and DKIM to be properly configured for your domain. It doesn't replace them but builds upon them.
Understanding DMARC Record Syntax
A DMARC record is a TXT record in your DNS with a specific syntax. Here's a breakdown of the key components:
| Tag | Description | Values |
|---|---|---|
| v=DMARC1 | DMARC version identifier | Must be exactly "DMARC1" (mandatory) |
| p | Policy for failed messages | none, quarantine, or reject (mandatory) |
| sp | Policy for subdomains | none, quarantine, or reject (optional) |
| rua | Aggregate report URI | mailto:address for aggregate reports |
| ruf | Forensic report URI | mailto:address for forensic reports |
| pct | Percentage of messages to which the DMARC policy is to be applied | 0-100 (default is 100) |
| fo | Failure reporting options | 0, 1, d, or s (optional) |
| rf | Format for failure reports | afrf (default) or iodef (optional) |
Policy: none
Monitor mode - no action taken on failures, but reports are sent
Policy: quarantine
Treat failures suspiciously (typically sent to spam folder)
Policy: reject
Block failures entirely (recommended for full protection)
DMARC Implementation Steps
Implement SPF and DKIM
Before implementing DMARC, ensure that SPF and DKIM are properly configured for your domain. DMARC relies on these authentication methods to work correctly.
Start with Monitoring Mode (p=none)
Begin with a policy of "none" to monitor authentication results without affecting email delivery. This helps you identify all legitimate sources sending email from your domain.
Analyze DMARC Reports
Review the aggregate reports sent to the address specified in your rua tag. Identify legitimate senders that need to be added to your SPF record or configured with DKIM.
Gradually Increase Policy Strictness
Once you've identified all legitimate senders, change your policy to "quarantine" with a small percentage (pct=10). Gradually increase the percentage as you confirm no legitimate email is being affected.
Implement Reject Policy
When you're confident that all legitimate email is properly authenticated, change your policy to "reject" to fully protect your domain from spoofing.
How to Set Up DMARC Records in Major DNS Providers
Cloudflare
- Log in to your Cloudflare account and select your domain.
- Navigate to the "DNS" section in the dashboard.
- Click "Add record" and select "TXT" as the record type.
- For the name, enter "_dmarc.yourdomain.com" (replace yourdomain.com with your actual domain).
- In the content field, enter your DMARC record (e.g.,
v=DMARC1; p=none; rua=mailto:[email protected]). - Set the TTL (Time to Live) to "Auto" or your preferred value.
- Click "Save" to create the record.
Namecheap
- Log in to your Namecheap account and go to the "Domain List".
- Click "Manage" next to the domain you want to configure.
- Select "Advanced DNS" from the navigation menu.
- Find the "HOST RECORDS" section and click "Add New Record".
- Select "TXT Record" from the type dropdown.
- For the host, enter "_dmarc" (without your domain).
- In the value field, enter your DMARC record.
- Set the TTL to the recommended value.
- Click the save icon (checkmark) to create the record.
GoDaddy
- Sign in to your GoDaddy Domain Portfolio.
- Click on your domain to access the Domain Settings page.
- Under "Additional Settings", select "Manage DNS".
- In the "Records" section, click "Add" to create a new record.
- Select "TXT" as the record type.
- For the host, enter "_dmarc" (without your domain).
- In the "TXT Value" field, enter your DMARC record.
- Set the TTL to the desired value.
- Click "Save" to add the record.
AWS Route 53
- Log in to the AWS Management Console and open the Route 53 console.
- In the navigation pane, choose "Hosted zones".
- Select the hosted zone for your domain.
- Choose "Create record".
- For the record name, enter "_dmarc.yourdomain.com" (replace with your domain).
- Select "TXT - Text" as the record type.
- In the value field, enter your DMARC record enclosed in quotes.
- Set the TTL value as needed.
- Click "Create records" to save.
Google Domains
- Sign in to Google Domains with your account.
- Select the domain you want to manage.
- Click on "DNS" in the left navigation menu.
- Scroll down to the "Custom resource records" section.
- In the first field, enter "_dmarc" (without your domain).
- Set the type to "TXT".
- In the "TTL" field, enter the time in seconds.
- In the "Data" field, enter your DMARC record.
- Click "Add" to save the record.
DMARC Policy Examples
Monitoring Mode (Recommended for Initial Setup)
This policy collects reports without affecting email delivery, allowing you to identify all legitimate senders.
Quarantine Mode (Intermediate Protection)
This policy quarantines 25% of failing messages (sends to spam) while still delivering most email.
Reject Mode (Maximum Protection)
This policy rejects all failing messages and requests both aggregate and forensic reports.
DMARC Best Practices
Do's
- Always start with
p=noneto monitor before enforcing policies - Set up a dedicated email address for DMARC reports
- Regularly review DMARC reports to identify new legitimate senders
- Ensure all email services (marketing, transactional, etc.) are properly authenticated
- Use DMARC analysis tools to help interpret reports
Don'ts
- Don't jump directly to
p=rejectwithout monitoring first - Avoid using personal email addresses for DMARC reports
- Don't ignore DMARC reports - they provide valuable security insights
- Avoid setting up DMARC without first implementing SPF and DKIM
- Don't forget to include all subdomains in your DMARC strategy
Important: DMARC implementation is a process, not a one-time setup. It requires ongoing monitoring and adjustment as your email ecosystem evolves.
Testing Your DMARC Record
After setting up your DMARC record, verify that it's working correctly using these methods:
DNS Lookup Tools
Use online tools like MXToolbox to verify your DMARC record is published correctly
Email Tests
Send test emails from different sources and check authentication results in headers
Report Monitoring
Verify that you're receiving DMARC aggregate reports at the specified address
Conclusion
DMARC is a powerful email authentication protocol that provides crucial protection against domain spoofing and phishing attacks. When properly implemented alongside SPF and DKIM, it significantly enhances your domain's email security and reputation.
The key to successful DMARC implementation is taking a gradual, monitored approach—starting with a monitoring policy, analyzing reports to identify all legitimate email sources, and gradually increasing policy strictness as you gain confidence in your configuration.
Final Tip: Consider using DMARC management services or tools that can help parse and analyze DMARC reports, especially if you receive high volumes of email from multiple sources.