What is a DKIM Record?
DKIM (DomainKeys Identified Mail) is an email authentication method that uses cryptographic signatures to verify that an email message was sent by an authorized server and that the message content hasn't been tampered with during transit.
Analogy: Think of DKIM as a wax seal on an important letter. The seal proves the document is authentic and hasn't been opened or altered since it was sealed by the sender.
When an email is sent, the outgoing mail server generates a unique cryptographic signature based on the message content and signs it with a private key. The receiving server then uses the public key published in your DNS to verify this signature, ensuring message integrity and authentication.
Why is DKIM Important?
Message Integrity Protection
DKIM ensures that email content hasn't been modified during transit, protecting against man-in-the-middle attacks and content tampering.
Sender Authentication
Provides cryptographic proof that the email was sent by an authorized server for your domain, not an imposter.
Improved Deliverability
Email providers trust DKIM-signed messages more, leading to better inbox placement rates and reduced spam filtering.
DMARC Requirement
DKIM is a fundamental component of DMARC implementation, which provides comprehensive email authentication.
How DKIM Works: The Signature Process
DKIM uses public-key cryptography to create and verify digital signatures. The process involves two main steps: signing outgoing emails and verifying incoming emails.
The sending mail server generates a hash of specific email headers and body content, then encrypts this hash with a private key. The receiving server decrypts the signature using the public key from your DNS and compares it with its own hash calculation.
Outgoing server signs email with private key
Email transmitted with DKIM signature
Receiving server verifies with public key from DNS
Note: Unlike SPF which authenticates the sending server, DKIM authenticates the message itself, providing protection even if the email is forwarded.
Understanding DKIM Record Syntax
A DKIM record is a TXT record in your DNS that contains the public key used to verify signatures. Here's a breakdown of the key components:
| Tag | Description | Values |
|---|---|---|
| v=DKIM1 | DKIM version identifier | Must be "DKIM1" (mandatory) |
| k= | Key type | Typically "rsa" (mandatory) |
| p= | Public key data | Base64-encoded public key (mandatory) |
| s= | Service type | "email" or "*" (optional) |
| t= | Flags | "y" (testing) or "s" (strict) (optional) |
| h= | Accepted hash algorithms | "sha1", "sha256" (optional) |
Selector Explained
DKIM uses a "selector" as part of the DNS record name (e.g., selector._domainkey.yourdomain.com). This allows you to maintain multiple keys for different purposes (marketing, transactional, etc.) and rotate keys without service interruption.
DKIM Implementation Steps
Generate DKIM Key Pair
Create a public/private key pair. Most email services provide tools to generate these, or you can use OpenSSL or online DKIM generators.
Choose a Selector
Select a meaningful name for your selector (e.g., "google", "default", "may2024"). This will be part of your DKIM record name.
Publish Public Key in DNS
Create a TXT record with your selector as part of the name and the public key as the value.
Configure Your Email Server
Install the private key on your mail server and configure it to sign outgoing messages with the appropriate selector.
Test and Verify
Send test emails and verify that DKIM signatures are being added correctly and can be validated by receiving servers.
How to Set Up DKIM Records in Major DNS Providers
Cloudflare
- Log in to your Cloudflare account and select your domain.
- Navigate to the "DNS" section in the dashboard.
- Click "Add record" and select "TXT" as the record type.
- For the name, enter "selector._domainkey" (replace "selector" with your chosen selector name).
- In the content field, enter your DKIM record (e.g.,
v=DKIM1; k=rsa; p=MIGfMA0GCSqGSIb3DQEBAQUAA4GNADCBiQ...). - Set the TTL to "Auto" or your preferred value.
- Click "Save" to create the record.
Namecheap
- Log in to your Namecheap account and go to the "Domain List".
- Click "Manage" next to the domain you want to configure.
- Select "Advanced DNS" from the navigation menu.
- Find the "HOST RECORDS" section and click "Add New Record".
- Select "TXT Record" from the type dropdown.
- For the host, enter "selector._domainkey" (replace "selector" with your chosen name).
- In the value field, enter your complete DKIM record.
- Set the TTL to the recommended value.
- Click the save icon (checkmark) to create the record.
GoDaddy
- Sign in to your GoDaddy Domain Portfolio.
- Click on your domain to access the Domain Settings page.
- Under "Additional Settings", select "Manage DNS".
- In the "Records" section, click "Add" to create a new record.
- Select "TXT" as the record type.
- For the host, enter "selector._domainkey" (replace "selector" with your chosen name).
- In the "TXT Value" field, enter your complete DKIM record.
- Set the TTL to the desired value.
- Click "Save" to add the record.
AWS Route 53
- Log in to the AWS Management Console and open the Route 53 console.
- In the navigation pane, choose "Hosted zones".
- Select the hosted zone for your domain.
- Choose "Create record".
- For the record name, enter "selector._domainkey.yourdomain.com" (replace with your selector and domain).
- Select "TXT - Text" as the record type.
- In the value field, enter your DKIM record enclosed in quotes.
- Set the TTL value as needed.
- Click "Create records" to save.
Google Domains
- Sign in to Google Domains with your account.
- Select the domain you want to manage.
- Click on "DNS" in the left navigation menu.
- Scroll down to the "Custom resource records" section.
- In the first field, enter "selector._domainkey" (replace "selector" with your chosen name).
- Set the type to "TXT".
- In the "TTL" field, enter the time in seconds.
- In the "Data" field, enter your complete DKIM record.
- Click "Add" to save the record.
DKIM Record Examples
Basic DKIM Record
This is a standard DKIM record with RSA encryption. The public key (p=) is truncated for readability.
DKIM Record with Testing Flag
The "t=y" flag indicates this is a test key. Receivers may treat signatures from test keys differently.
DKIM Record with SHA-256
This record specifies SHA-256 as the preferred hash algorithm, which is more secure than the default.
DKIM Key Rotation Best Practices
Why Rotate Keys?
- Security best practice to limit exposure if a key is compromised
- Allows for upgrading to stronger key lengths over time
- Maintains compliance with security standards
- Prevents issues when changing email service providers
Rotation Strategy
- Generate a new key pair while keeping the old one active
- Publish the new public key with a different selector
- Configure your email server to sign with both keys temporarily
- Monitor to ensure receivers accept the new key
- Remove the old key after a transition period (typically 2-4 weeks)
Selector Naming Convention for Rotation
Use date-based selectors (e.g., "dkim202406", "dkim202407") to make key rotation easier to manage. This allows you to maintain multiple active keys during transition periods.
DKIM Best Practices
Do's
- Use at least 1024-bit RSA keys (2048-bit recommended)
- Implement key rotation every 6-12 months
- Use descriptive selectors for different email streams
- Test DKIM signatures regularly with external tools
- Keep private keys secure and accessible only to mail servers
Don'ts
- Don't use weak encryption (less than 1024-bit keys)
- Avoid sharing private keys across multiple servers unnecessarily
- Don't ignore DKIM verification failures in email headers
- Avoid using the same selector forever without rotation
- Don't forget to include all email sending services in DKIM setup
Important: DKIM works alongside SPF and DMARC. For comprehensive email authentication, implement all three protocols together.
Testing Your DKIM Record
After setting up your DKIM record, verify that it's working correctly using these methods:
DNS Lookup Verification
Use nslookup or online tools to verify your DKIM record is published correctly in DNS.
Email Header Analysis
Send test emails and check the Authentication-Results header for DKIM verification status.
Online Validators
Use DKIM validators that can test your configuration end-to-end.
Checking Email Headers
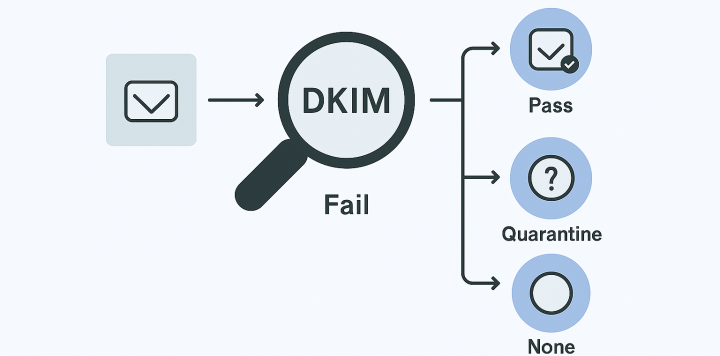
Look for headers like "Authentication-Results" in received emails. A successful DKIM verification will show "dkim=pass" with details about the signature verification.
Common DKIM Issues and Solutions
Issue: "Signature Syntax Error"
Solution: Check that your DKIM record is properly formatted with all required tags and that the public key is correctly encoded without line breaks or extra spaces.
Issue: "Signature Body Hash Mismatch"
Solution: Ensure your email server is correctly calculating the body hash. Some email modifications (like adding footers) can cause mismatches.
Issue: "Public Key Not Available"
Solution: Verify that your DKIM record is published in DNS and that the selector name matches what's used in the email signature.
Issue: "Signature Expired"
Solution: Check the timestamp in the DKIM signature. Ensure your server's clock is synchronized and that signatures aren't being created with expiration times that are too short.
Conclusion
DKIM is a critical component of modern email authentication that provides cryptographic verification of message integrity and sender authorization. When properly implemented, it significantly enhances email security and deliverability.
Unlike SPF which focuses on the sending server, DKIM authenticates the message content itself, providing protection even when emails are forwarded. This makes it an essential part of a comprehensive email security strategy when combined with SPF and DMARC.
Final Tip: Consider using email authentication monitoring services that can alert you to DKIM failures and help troubleshoot configuration issues before they impact your email deliverability.